
Alchemy Help:
Step-by-step instructions
[Contents]
[Index]
[Project Preferences]
[Alchemy Preferences]
[Overview]

Serving up a home page from scratch
This tutorial will give you step-by-step instructions for
creating a very simple home page with Alchemy and uploading it to your web server.
You will create a new project, use the internal Web Editor to create the home
page, view the page in your web browser application, add the page to your project
and upload the project to your web server. Please note that this tutorial is intended
to be a walk-through of the mechanics of setting up a new project, not an in-depth
discussion of how Alchemy works. You can find this type of information in the
Project Preferences,
Alchemy Preferences and Overview sections of
the manual. There are also links to detailed information at the beginning of
each section below.
The tutorial assumes the following:
- You have installed the Alchemy software in the c:\alchemy
directory; make adjustments whenever you see a reference to this directory if
you have installed the software in a different directory.
- You have told Alchemy where to find your web browser application,
netscape.exe for example.
- You have obtained all of the necessary items required to connect to and
transfer files to your web server, such as the URL of your home page
(http://whatever), the server's network name (server1.whatever.com), etc. If
you don't have these items, you can still complete the tutorial up to the point
of actually uploading the project, but you will have to supply some dummy values
when you create the project.
Ok, let's get started!
Step 1. Create a new project
The project will be located in the
c:\alchemy\example directory. Go to the Alchemy project
window and select the File/New project file menu item. You will
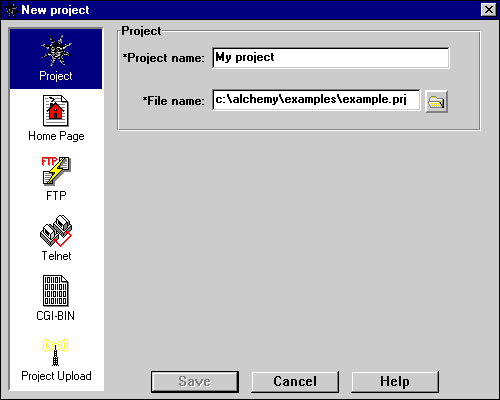
see the New project dialog box.
There are six areas in the dialog, we will fill them in one by one as we walk through
the six sections below. As we proceed, you can get a detailed explanation of what's in
each of the fields in a particular area and what it's used for by clicking the area name
that appears at the beginning of the section.
You can move between areas in the dialog box by clicking on the list box at the left. The
first area, Project, is already selected.
1. Project
- Type the name of the project into the Project name field.
Let's call it "My project".
- Type the complete path name of the new project file into the
File name field. This will be "c:\alchemy\examples\example.prj"
2. Home page
- Click on the Home Page icon in the listbox at the left-hand side of
the dialog box to display the home page fields.
- Type the URL of your home page into the URL field. If you
do not yet have a URL, make something up since this is a required field.
- Type the name of the server directory in which your home page will be
located into the Server home directory field. If you
do not yet have a directory name, make something up since this is a required field.
- Type the file name that your home page will have after it is copied to
the server into the File name on server field. For instance,
many service providers require you to use the name "index.html". If you do not yet
have this information, make something up since this is a required field.
- Type the actual file name of your home page into the Local file name
field. Let's call it "index.htm".

3. FTP
- Click on the FTP icon in the listbox at the left-hand side of
the dialog box to display the FTP fields.
- Enter the values that you received from your service provider for establishing
an FTP session with your server. For example, they might look like this:
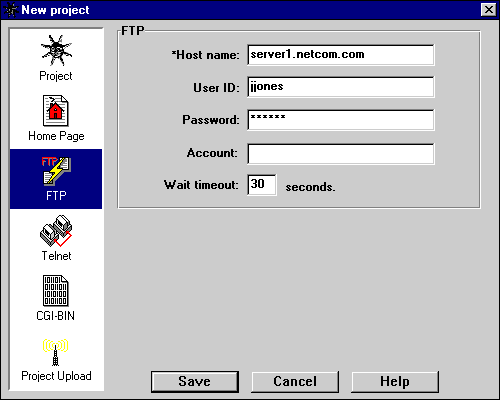
Alchemy uses FTP to upload your project to the server, to automatically connect to
your server when you start an FTP session, and optionally to set the
access permissions on your files. If you don't have this information, you will not
be able to upload your project to the server, and you must make up a value
for the Host name since it is a required field.
4. Telnet
- Click on the Telnet icon in the listbox at the left-hand side of
the dialog box to display the Telnet fields.
- Enter the values that you received from your service provider for establishing
a Telnet session with your server. For example, they might look like this:
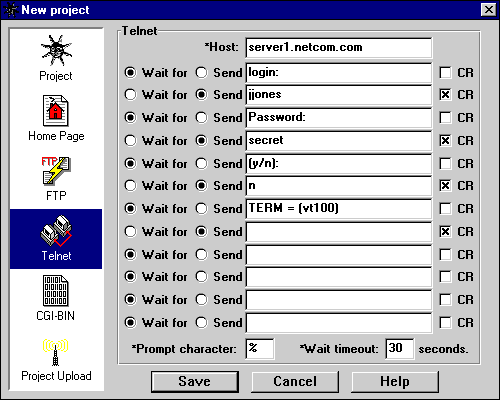
Alchemy uses this information to automatically connect to your server when you
start a Telnet session, and optionally to set the access permissions on your
files.
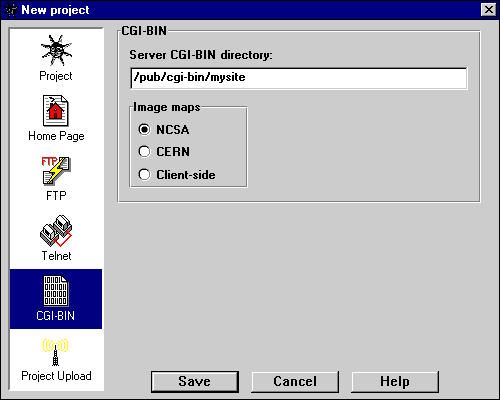
5. CGI-BIN
- Click on the CGI-BIN icon in the listbox at the left-hand side of
the dialog box to display the CGI-BIN fields.
- Type the name of the server directory in which your CGI-BIN files will be
stored into the Web server CGI-BIN directory field. If you do
not use CGI-BIN (server-side image maps, forms, etc.) you can leave this field blank.
- Select the default type of clickable image maps you will be using. If you will not
be using image maps, or if you don't know, select NCSA. This information is used
by the Alchemy Image Map Editor when creating new image maps. Note that you are not
limited to using only the type of image map you select here; this is merely the default.
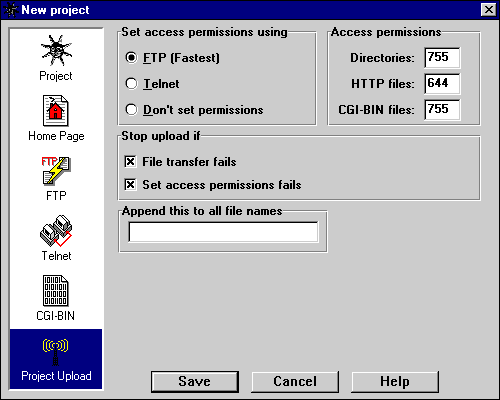
6. Project Upload
- Click on the Project Upload icon in the listbox at the left-hand side of
the dialog box to display the project upload fields.
- Select the method you want to use to set file access permissions by clicking the
appropriate radio button in the Set access permissions using box.
FTP is the default, and will work on most servers.
- Specify the access permissions for each type of file in your project in the
Access permissions box. The default values are correct for most
servers.
- Specify the manner in which upload errors should be handled by checking the
appropriate boxes in the Stop upload if box. If you don't care,
use the default settings.
- If your service provider requires you to append identification text to your files
when you upload them, type the text into the Append this to all file names
field.
At this point, the Save pushbutton should be enabled. Press the
Save button to create the new project file. When you are returned
to the Alchemy project window, you will see that the project folder is named
"My project". The two folders below it, "Home" and "CGI-BIN", are built-in folders
that are part of every Alchemy project.
Step 2. Create the home page
In this step you will use the Alchemy Web Editor to create
the home page. The file name will be c:\alchemy\example\index.htm.
Go to the Alchemy Web Editor window and proceed as follows:
- Select the File/New buffer menu item. You will get a new,
empty edit buffer.
- Select the Insert/Document template menu item. This will insert
an empty HTML template into your document.
- Select the text that reads My Title and type in the title of the document.
Let's be creative and call it "My Home Page".
- Let's select a background image for the home page. Move the cursor into the BODY
tag and position it between the words BGSTART and bgcolor. Type in
the text background="bkground.gif". The file "bkground.gif" is one of
two image files that we have placed in the project directory for you to use in this tutorial.
The contents of the BODY tag should now read
BGSTART background="bkground.gif" bgcolor="#FFFFFF" link="#0000FF" text="#000000" vlink="#AF00AF" alink="#00AF00" BGEND
- Now let's insert a second image into the home page, this time using an HTML
IMG tag. Move the cursor down so that it's within the body of the
document and press the Enter key to open up a blank line, then position the
cursor on the blank line. Select the Insert/Image... menu item to
display the Insert image dialog. Click on the browse button to the
right of the SRC= field to display the Open File
dialog box, and navigate to the c:\alchemy\example directory, which is your project
directory (you should already be in it). The dialog will now display a list of the
image files in your project directory. Select the file "surfs_up.gif" and press the
Open button. At this point the SRC= field in the
Select image dialog will be filled in, along with the width and
height of the image. Press the OK button to insert the image
into your document.
- Now let's insert some header text. Press the Enter key to open up another blank
line and type in the words "Surf's Up!". Now click the mouse on the H in Hello and
drag right until the entire phrase is selected. At this point the text tools in the
tool palette on the left side of the Web Editor window will become enabled. Click on
the H1 tool to format the selected text using the HTML H1 style.
That's it, you're done!
Step 3. View the home page in your web browser
Select the File/View current buffer in browser
menu item to see the page in your web browser application.
Step 4. Add the home page to the project
Select the File/Save current buffer as... menu item to save
your home page as "c:\alchemy\example\index.htm", then select the
File/Add current buffer to project menu item to add the home page
to the project. Now go to the Alchemy Project window, where you will see that
there is now a new folder called "My Home Page", which is the
HTML document we just created. If you select the folder by clicking on it with the
mouse, you will see that it contains the two images that we added.
Step 5. Upload the project to the web server
If you filled in the host information when you created the project
(items 2 through 6) you can go to the Project window
now and select the Project/Upload project to server using dependencies... menu item to
send your project to the web server. If you have trouble while uploading the
project, it will probably be a problem with the FTP and/or Telnet values. You can
use the Message window to troubleshoot your setup. Remember,
the FTP and Telnet settings in Alchemy are the same as those that you would use to
connect to your service provider with any other FTP or Telnet application. If they
work in an external application (WS_FTP.EXE, for example) then they will work in
Alchemy.
 A Next Wave communication. © Copyright 1996
Next Wave Software.
All rights reserved. Feedback to
feedback@stormsurge.com.
A Next Wave communication. © Copyright 1996
Next Wave Software.
All rights reserved. Feedback to
feedback@stormsurge.com.